API Tutorial
Average read time: 19 minutes
After completing the “Getting Started” guide, the next step is to integrate the ParityVend API into your website. This guide will walk you through the API basics that you need to know to start and also provide some examples and “recipes” that will help you integrate the ParityVend API into your project. We highly recommend that you read the full API overview before starting to use the ParityVend API in your application.
Getting Your API Keys
To start using the ParityVend API, you first need to obtain the API keys that ParityVend has generated for you. Follow the simple steps below to get your API keys.
Step 1: Open the API Window
Access the ‘API’ window: you can always view the API keys for all your projects in this window. Additionally, you can re-issue your keys there. To open it, follow these steps:
Go to the Dashboard.
In the menu, click on “API”.
Scroll down until you see your project with the API keys.
Step 2: Copying Your Keys
Once you see your project with the three keys, you can click on any key to copy it to the clipboard. Now, let’s continue to the next section to examine each key and its uses.
Explanation of API Keys
ParityVend API uses a pair of public_key and private_key, along with a special token called testing_secret. See the explanation below to learn what those keys are and where they should be used.
public_key:
Can be freely shared and is intended to be seen by anyone.
Gives limited access to the API.
Should be used on the frontend of your website/web-applications.
private_key:
Must be kept secure; never share it with anyone.
Gives you full access to the API.
Should be used only on your backend (where you can ensure the security of the key).
testing_secret:
Enables the special “testing mode” for the
public_key.Disables security measures and is required for testing on localhost.
Remove it from the public source code before going live.
Never use it in production, as it imposes security risks.
Note
Never share private_key and testing_secret with anyone, and keep them secure. Never use private_key on your frontend, or anywhere where the public can see or access it. Never leave “testing mode” enabled on production/live websites.
ParityVend API: “Hello World”
After you have your API keys, let’s do a traditional “hello world” for the ParityVend API. But first, let’s understand the structure of the ParityVend API and its basics.
Structure of the API
ParityVend API is split into two groups: backend and frontend:
Backend group:
Offers 7 endpoints.
Each request must be authenticated with your
private_key.Endpoints give you full access to the API.
Meant to be used from your server.
As highlighted in the name, it should be used only on your backend (or where you can ensure the security of the
private_key).
Frontend group:
Offers 4 endpoints (plus 4 for “testing mode”).
Each request must be authenticated with your
public_key.Meant to be used on the devices of your clients/visitors.
Endpoints give you limited access to the API.
As highlighted in the name, it should be used on your frontend.
Offers special testing mode that disables certain security checks that are required for running on
localhost.
All endpoints have a similar request structure, where the key (whether it’s public_key or private_key) is always the first in the request fields. After that, the endpoint may accept other required or additional arguments. All requests should be completed as a simple GET. Endpoints return JSON, which always has a "status" key that can be equal to either "ok" or "error", indicating whether the request was completed successfully or with an error.
Your First Request with ParityVend API
Now, let’s try to make your first “hello world” request with the ParityVend API!
This is the URL of the get-quota-info endpoint. It provides information about your account’s current quota information. Also, making requests to this endpoint does not count against your quota usage (good news for you).
To form your hello world request to the get-quota-info endpoint, take the URL below and change <YOUR_PRIVATE_KEY> with your actual private_key you copied in the earlier steps:
https://api.parityvend.cloud/backend/get-quota-info/<YOUR_PRIVATE_KEY>/
After you insert your private key, simply open this URL in any browser. You can also use any HTTP client (such as curl, wget, etc.), or any HTTP request library (such as requests, axios, httpx, etc) and make a GET request to this URL.
You will get a JSON response similar to this, where you will find your current quota information:
get-quota-info endpoint:¶{
"status": "ok",
"quota_limit": 1500000,
"quota_used": 0,
"quota_left": 1500000
}
Congrats! You have just made your first ParityVend API request! This means that everything works correctly, and you are good to go! You are ready to move on to the next section.
Hint
If you get an error when you make this request, first check whether you have entered your private_key correctly; ensure that you did not accidentally enter any trailing spaces. If you still get an error, refer to the “Debugging Guide”.
Brief Overview of Endpoints
In this section, we will briefly overview backend and frontend endpoints. Let’s start with the backend group, which has a total of 7 endpoints.
Backend: Primary Endpoints
4 primary endpoints. Used to provide discount functionality to your pricing flows. The responses they return are closely related.
/backend/get-country-from-ip/
Takes in any IP address as an input and returns the identified country in the ISO 3166-1 alpha-2 standard. One special return case is
XX, which means that the visitor uses a VPN, Proxy, or TOR.
- Auth: private_key Output: JSON
Input argument 1: IP-address
/backend/get-discount-from-ip/
Takes in any IP address as an input and returns discount information if you have configured it to offer discounts for the IP’s country. It uses
base currency(optional argument, by default equals toUSD) to include the exchange rate for the country’s local currency.
- Auth: private_key Output: JSON
/backend/get-banner-from-ip/
Takes in any IP address as an input and returns a rendered HTML banner. This is the same HTML banner that is used by the No-Code solution, except that this is a backend version that works from the input IP address. It uses
base currency(optional argument, by default equals toUSD) to include the exchange rate for the country’s local currency.
- Auth: private_key Output: HTML
/backend/get-discount-with-html-from-ip/
Takes in any IP address as input and returns both discount information and an HTML banner. You can think of it as a blend of the previous two endpoints. It uses
base currency(optional argument, by default equals toUSD) to include the exchange rate for the country’s local currency.
- Auth: private_key Output: JSON
Backend: Miscellaneous endpoints
3 miscellaneous endpoints. They can be related to your account, project, or metadata.
/backend/get-quota-info/
Returns quota information for your account, including how much you have used and how much quota you have left.
- Auth: private_key Output: JSON Quota-free
Input: Does not take any input
/backend/get-discounts-info/
Returns discount information about the country groups you have configured for the current project. For each country, a coupon and discount percentage are attached.
- Auth: private_key Output: JSON
Input: Does not take any input
/backend/get-exchange-rate-info/
Returns a dictionary for 170 world currencies with the base currency being USD, all in the ISO 4217 standard. It takes one optional argument,
base currency, which is used as a “base” for the returned dictionary, where all currencies returned are calculated against the base currency. By default, the base currency is set to USD.
- Auth: private_key Output: JSON Plan: only for paid plans
Input argument 1: Base currency (optional, default=USD)
Frontend: Primary Endpoints
The Frontend group offers four primary endpoints. These are used to provide discount functionality to your pricing flows, directly integrated into the frontend of your website. These endpoints are meant to be used by the users/visitors of your websites directly from their devices. Therefore, they don’t take an “IP-address” as input, as the IP-address is detected automatically from the visitor’s device. The responses they return are closely related.
/frontend/get-country/
Returns the identified country of the requestor’s IP-address in the ISO 3166-1 alpha-2 standard. One special return case is
XX, which means that the visitor uses a VPN, Proxy, or TOR.
- Auth: public_key Output: JSON
No arguments
/frontend/get-discount/
Uses the requestor’s IP-address and returns discount information if you have configured it to offer discounts for the requestor’s country. Uses
base currency(optional argument, by default equals toUSD) to include the exchange rate for the country’s local currency.
- Auth: public_key Output: JSON
/frontend/get-banner/
Uses the requestor’s IP-address and returns a rendered HTML banner. This is exactly the endpoint used by the No-Code solution to deliver HTML banners to the websites. Uses
base currency(optional argument, by default equals toUSD) to include the exchange rate for the country’s local currency.
- Auth: public_key Output: HTML
/frontend/get-discount-with-html/
Uses the requestor’s IP-address and returns both discount information and an HTML banner. You can think of it as a blend of the previous two endpoints. Uses
base currency(optional argument, by default equals toUSD) to include the exchange rate for the country’s local currency.
- Auth: public_key Output: JSON
Each endpoint listed above has a “mirror” version of itself, with testing-mode- added to its name. Namely, /frontend/testing-mode-get-banner/, /frontend/testing-mode-get-country/, /frontend/testing-mode-get-discount/, and /frontend/testing-mode-get-discount-with-html/. These are the special “testing mode” versions of the frontend endpoints group, to which you can add a testing-secret parameter to enable the testing mode. This allows you to test and debug your integration on localhost, 127.0.0.1, or any other domain. The live versions of the endpoints will simply not work anywhere outside your website, meaning that you would not be able to use them on localhost while testing your integration on your local development environment. Learn more about how to use the testing mode on the “ParityVend Testing Mode” page.
Integration ideas
Unlock the full potential of your business with the versatile capabilities of the ParityVend API. Below, you’ll discover a range of innovative ways to leverage this powerful tool to enhance your website’s functionality and drive business growth. From building an abuse-proof checkout system to dynamically adjusting product prices based on visitor location, the ParityVend API offers a myriad of features, that can be used to optimize the user experience, prevent fraud, and personalize interactions. Explore the following ideas to see how you can harness the power of location-based data to create a more tailored and secure online environment for your customers:
Build Abuse-Proof Checkout: We highly recommend integrating the ParityVend API into your website’s checkout process to prevent abuse of discounts. While offering coupons with discounts can help expand your business globally, it’s important to protect against coupon code sharing. By incorporating the /backend/get-discount-from-ip/ or /backend/get-country-from-ip/ endpoint from the ParityVend API, you can verify the user’s location at checkout and ensure that their coupon code is valid for that location (e.g., India). This implementation will create a secure and abuse-proof system for your business.
Dynamic Pricing: Use the ParityVend API for its primary goal: to dynamically adjust product prices based on the visitor’s location. This ensures fairness and balance by aligning prices with the local economy. For this case, you can use the /frontend/get-discount/ or /backend/get-discount-from-ip/ endpoints.
Personalized Offers: Leverage ParityVend’s location detection capabilities to dynamically present targeted discounts and promotions to website visitors based on their country, potentially increasing sales and conversion rates. Potentially useful endpoints: /frontend/get-discount/ or /backend/get-discount-from-ip/.
Enhanced Fraud Prevention: Use ParityVend API to identify and block activity associated with VPNs and proxies, offering enhanced protection against fraudulent transactions within payment-related workflows. Consider /backend/get-country-from-ip/ endpoint to detect suspicious IP addresses.
Access Control based on Location: The ParityVend API can be used to empower website owners to implement location-based access restrictions, potentially blocking suspicious activity or anonymized traffic (e.g., VPN usage) from accessing specific website sections. Utilize the /backend/get-country-from-ip/ endpoint to detect the visitor’s country.
Localized Currency Display: ParityVend API can facilitate automatic product price display in the visitor’s local currency, enhancing the user experience and potentially improving conversion rates by eliminating the need for mental currency conversions. Think about the /frontend/get-discount/ or /backend/get-discount-from-ip/ endpoints, as well as the /backend/get-exchange-rate-info/ endpoint to retrieve exchange rate information.
Location-Specific Welcome Offers: The ParityVend API enables you to create personalized welcome offers and discounts for first-time visitors based on their country, potentially fostering a positive first impression and encouraging engagement. For this idea, /frontend/get-discount/ or /backend/get-discount-from-ip/ endpoints can be useful.
Location-Aware Content Optimization: The ParityVend API can empower website owners to dynamically adjust website content, promotions, and even language options based on the visitor’s location, potentially improving user experience and engagement. Leverage endpoints like /frontend/get-country/ or /backend/get-country-from-ip/ endpoints to detect the visitor’s country.
Personalized Product Recommendations: ParityVend’s API’s location data and purchasing power insights can be leveraged to dynamically recommend products relevant to the visitor’s cultural context and financial realities, potentially increasing cross-selling and upselling opportunities. Use the /backend/get-country-from-ip/ endpoint to detect the visitor’s country.
Integration Example
After providing a brief overview of the ParityVend API endpoints, we can proceed with the actual integration of the API into your website. We will provide examples and “recipes” to help you successfully build a pricing flow with the ParityVend API. Some examples will demonstrate the true flexibility of ParityVend by illustrating how to make use of both the ParityVend No-Code and ParityVend API simultaneously.
Note
All integration examples assume that you have already obtained your API keys. Additionally, these examples assume that you have created a “default” project, meaning that you have not made any changes to the country groups or discounts. If you have made changes, simply create a new project for learning purposes and use the domain “example.com”.
Integration Example: Custom Pricing Page
In this example, we will explain how to use the ParityVend API to create an adaptive pricing page for your product using the /frontend/get-discount/ endpoint. This example focuses on the frontend group endpoint.
Step 1: Preparation
Suppose you have a wonderful pricing page on your website for your product A. Currently, your pricing is fixed and shows the same prices to all people. Let’s make it adaptive and integrate the ParityVend API to automatically make this pricing fairer, more accessible, and more profitable!
If you wish to follow this example locally, create a file named
pricing.htmland copy the initial code below into it.Don’t forget to insert your
public_keyandtesting_secretwhen you copy the example code.Later in this tutorial, only parts of the code will be shown for convenience. For each code block, you will see a link “view full HTML” that you can use to access the complete HTML code.
Here is an initial pricing page (click to expand):
Initial pricing page (pricing.html)
<!DOCTYPE html>
<html lang="en">

<head>
   <meta charset="utf-8" />
   <meta name="viewport" content="width=device-width, initial-scale=1, shrink-to-fit=no" />
   <title>ParityVend Pricing example</title>

   <link rel="stylesheet" href="https://cdn.jsdelivr.net/npm/[email protected]/dist/css/bootstrap.min.css"
      integrity="sha384-ggOyR0iXCbMQv3Xipma34MD+dH/1fQ784/j6cY/iJTQUOhcWr7x9JvoRxT2MZw1T" crossorigin="anonymous" />

   <style>
      @import url('https://fonts.cdnfonts.com/css/chillax');

      body {
            font-family: Chillax, sans-serif;
      }

      .container {
            max-width: 960px;
      }

      .pricing-header {
            max-width: 700px;
      }

      .card-deck .card {
            min-width: 220px;
      }

      .card {
            border-radius: 2rem;
      }

      .card>.card-header {
            border-radius: 2rem 2rem 0 0;
      }

      .btn-group-lg>.btn,
      .btn-lg {
            border-radius: 1.3rem;
      }
   </style>
</head>


<body>
   <div class="pricing-header px-3 py-3 pt-md-5 pb-md-4 mx-auto text-center">
      <h1 class="display-4">Pricing Example</h1>
      <p class="lead">
            Making your pricing adaptive is easy with ParityVend!
      </p>
   </div>

   <div class="container">
      <div class="card-deck mb-3 text-center">
            <div class="card mb-4">
               <div class="card-header">
                  <h4 class="my-0 font-weight-normal">Lite</h4>
               </div>
               <div class="card-body">
                  <h1 class="card-title pricing-card-title">
                        <span class="plan-price">$9</span> <small class="text-muted">/ mo</small>
                  </h1>
                  <ul class="list-unstyled mt-3 mb-4">
                        <li>2 GB bandwith</li>
                        <li>free support</li>
                        <li>proxy setup</li>
                  </ul>
                  <button type="button" class="btn btn-lg btn-block btn-outline-primary">
                        Sign up now
                  </button>
               </div>
            </div>
            <div class="card mb-4">
               <div class="card-header">
                  <h4 class="my-0 font-weight-normal">Pro</h4>
               </div>
               <div class="card-body">
                  <h1 class="card-title pricing-card-title">
                        <span class="plan-price">$15</span> <small class="text-muted">/ mo</small>
                  </h1>
                  <ul class="list-unstyled mt-3 mb-4">
                        <li>10 GB bandwith</li>
                        <li>free support</li>
                        <li>proxy setup</li>
                  </ul>
                  <button type="button" class="btn btn-lg btn-block btn-primary">
                        Get started
                  </button>
               </div>
            </div>
            <div class="card mb-4">
               <div class="card-header">
                  <h4 class="my-0 font-weight-normal">Enterprise</h4>
               </div>
               <div class="card-body">
                  <h1 class="card-title pricing-card-title">
                        <span class="plan-price">$29</span> <small class="text-muted">/ mo</small>
                  </h1>
                  <ul class="list-unstyled mt-3 mb-4">
                        <li>15 GB bandwith</li>
                        <li>free support</li>
                        <li>proxy setup</li>
                  </ul>
                  <button type="button" class="btn btn-lg btn-block btn-primary">
                        Contact us
                  </button>
               </div>
            </div>
      </div>
   </div>
</body>

</html>
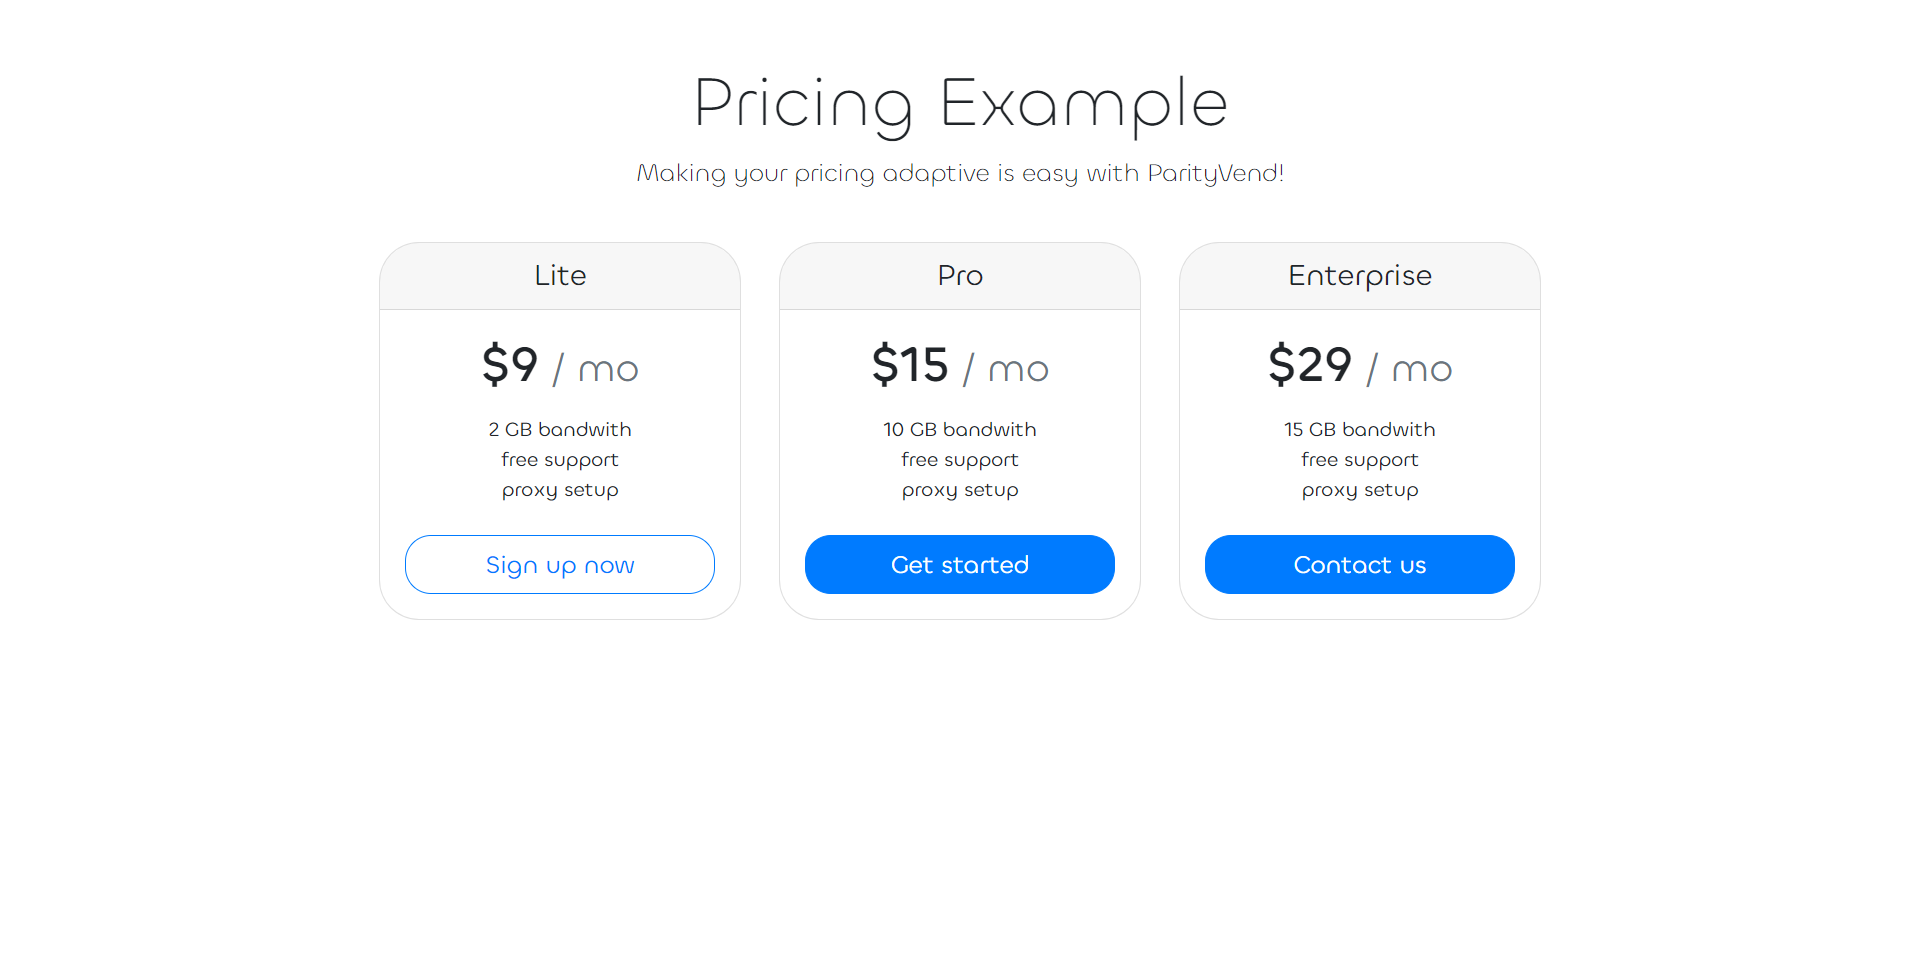
As you can see, this pricing page has prices hardcoded in it. To make it adaptive and integrate the ParityVend API, we first need to ensure that you store your prices in a programmatic way. There are multiple ways to do it. For example, you could store your prices in a simple variable, something like const prices = { ... }, or as an HTML attribute like this: <span data-price="9.99">...</span>.
Let’s create a variable that holds our prices and use the attribute on the price element to get the correct price. We’ll make some changes to the pricing page’s <head> element to include a <script> with some JavaScript code and also add the attribute data-plan to each price <span>.
...

   <script>
      window.addEventListener('DOMContentLoaded', function () {
            const prices = {
               lite: 9.0,
               pro: 15.0,
               enterprise: 29.0,
            }

            const priceSpans = document.querySelectorAll('.plan-price');

            for (let i = 0; i < priceSpans.length; i++) {
               const priceSpan = priceSpans[i];
               let price = prices[priceSpan.dataset.plan];
               priceSpan.textContent = '$' + price.toFixed(0);
            }
      });
   </script>
 </head>
 <body>

 ...

   <h1 class="card-title pricing-card-title">
      <span data-plan="lite" class="plan-price">$9</span>
      <small class="text-muted">/ mo</small>
   </h1>

   ...

   <h1 class="card-title pricing-card-title">
      <span data-plan="pro" class="plan-price">$15</span>
      <small class="text-muted">/ mo</small>
   </h1>

   ...

   <h1 class="card-title pricing-card-title">
      <span data-plan="enterprise" class="plan-price">$29</span>
      <small class="text-muted">/ mo</small>
   </h1>

...
When you refresh the page, you’ll notice that the pricing page appears unchanged. However, behind the scenes, a significant change has occurred. The page has taken its first step towards becoming adaptive. By storing prices as variables, we have paved the way for integrating the ParityVend API into the pricing page.
Step 2: Integrating ParityVend API
Let’s modify the <script> and add some ParityVend API integration code that will use the /frontend/get-discount/ endpoint to automatically get the discounts based on the visitor’s location and then change our prices based on this discount. A simple and quick way to do it could be this.
A quick write-down of what is changed:
Add a
getDiscountfunction that uses the/frontend/get-discount/endpoint to get discount information for the visitor.A
discount-labelelement and some styles for it, which will be used to display discount information to the visitors where ParityVend is active.Finally, modify the price-changing code to apply the discount from ParityVend API.
Don’t forget to change this code to replace <YOUR PUBLIC KEY> with your actual public_key!
   <style>
      ...

      #discount-label {
            font-weight: 500;
            background-color: rgba(191, 202, 214, 0.31);
            padding: 1rem;
            border-radius: 2rem;
            display: none;
      }
   </style>

   <script>
      async function getDiscount() {
            let url = "https://api.parityvend.cloud/frontend/get-discount/";
            url += '<YOUR PUBLIC KEY>';

            const response = await fetch(url);
            const jsonData = await response.json();

            if (jsonData.status !== "ok") {
               console.error(
                  "ParityVend API returned an error:",
                  JSON.stringify(jsonData)
               );
               return;
            }

            if (jsonData.discount) {
               return {
                  discount: jsonData.discount,
                  discount_str: jsonData.discount_str,
                  conversion_rate: jsonData.currency.conversion_rate,
                  symbol: jsonData.currency.symbol,
                  country: jsonData.country.name,
               }
            }
      }

      window.addEventListener('DOMContentLoaded', async function () {
            const prices = {
               lite: 9.0,
               pro: 15.0,
               enterprise: 29.0,
            }

            const priceSpans = document.querySelectorAll('.plan-price');
            const discountInfo = await getDiscount();

            const discountLabelElm = document.getElementById('discount-label');
            if (discountInfo) {
               discountLabelElm.textContent = `It seems you are from ${discountInfo.country}. We support PPP and want to make our prices fair for everyone, so we have applied a ${discountInfo.discount_str} discount for you!`;
               discountLabelElm.style.display = 'block';
            } else {
               discountLabelElm.style.display = 'none';
            }

            for (let i = 0; i < priceSpans.length; i++) {
               const priceSpan = priceSpans[i];
               let price = prices[priceSpan.dataset.plan];

               if (discountInfo) {
                  newPrice = price * (1- discountInfo.discount);
                  priceSpan.textContent = '$' + newPrice.toFixed(2);
               } else {
                  priceSpan.textContent = '$' + price.toFixed(0);
               }
            }
      });
   </script>
</head>

<body>
      ...
      <p class="lead">
         Making your pricing adaptive is easy with ParityVend! <div id="discount-label"></div>
      </p>
      ...
Amazing! Now, when you open this pricing page in your browser, you will see that… it doesn’t work. Why?
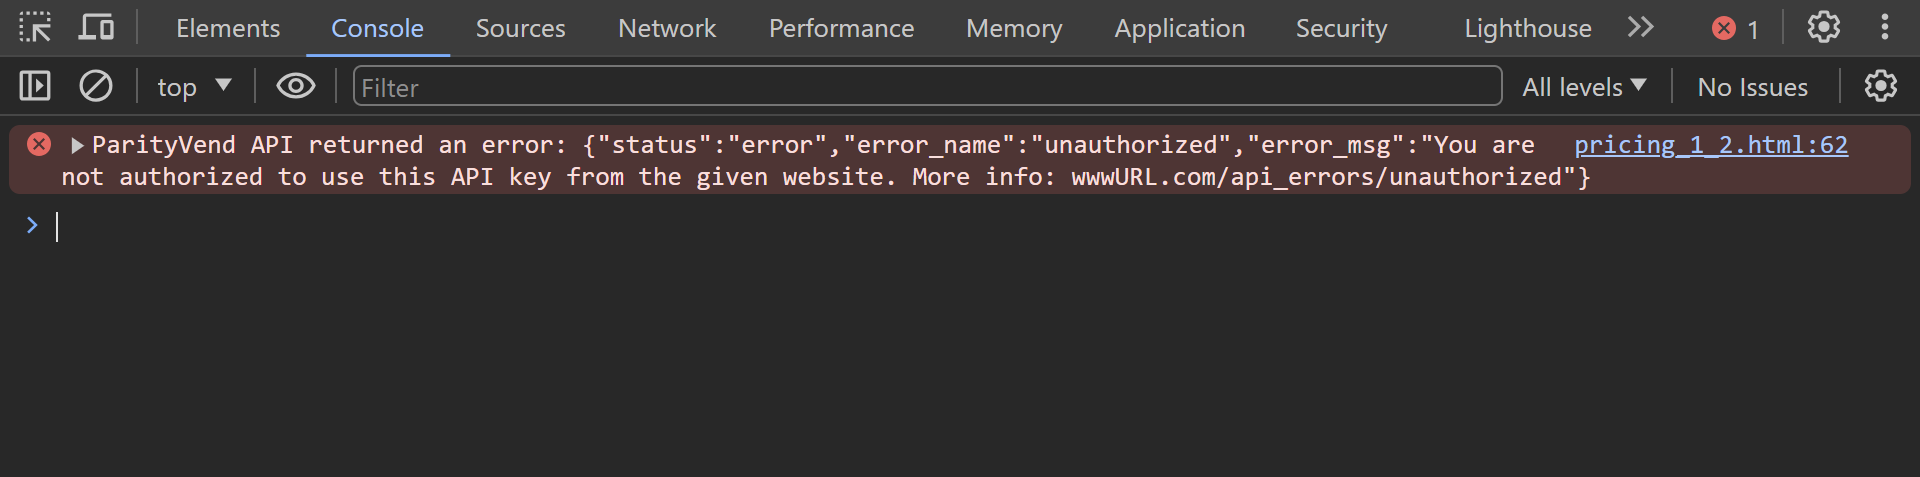
If you open the Console of your browser’s devtools, you will see an error message, saying that ParityVend API has returned a non-OK response. Let’s read the response’s error message:
"error_msg": "You are not authorized to use this API key from the given website"
Why does it happen? The reason for this behavior is that you are likely viewing this pricing page example on your local development environment, which could be a localhost or 127.0.0.1 domain if you are running it on a server, or simply a local file (file://) that you have opened in your browser. ParityVend employs a security feature known as Origin Checking to enhance the integrity of your integration. As part of this feature, ParityVend automatically examines all request headers, specifically the Origin header. This mechanism is crucial in preventing unauthorized use of your integration by ensuring that only requests originating from your website are accepted.
When you send a request from your local machine, your web browser automatically includes a special Origin header, which in this case could be equal to localhost, 127.0.0.1, or even null. ParityVend verifies this header to confirm that the request genuinely originates from your website, rather than from someone attempting to exploit your integration. If ParityVend detects that the request’s Origin does not match the domain of your website (which you have entered during the project’s creation), it will reject any requests made, deeming them “malicious”.
Step 3: Enable testing mode
However, testing integrations is a fundamental necessity for any developer. Therefore, ParityVend offers a special “testing mode” that disables this Origin check, allowing you to test your integration on any domain, even if it does not match your configured project’s domain, and even if the Origin equals localhost, 127.0.0.1, or even null.
To enable the testing mode and test our integration, we need to add the testing-mode- prefix to the endpoint’s URL and include your testing_secret as a parameter. This will prompt ParityVend to enable the testing mode, allowing you to use your integration on a local development environment.
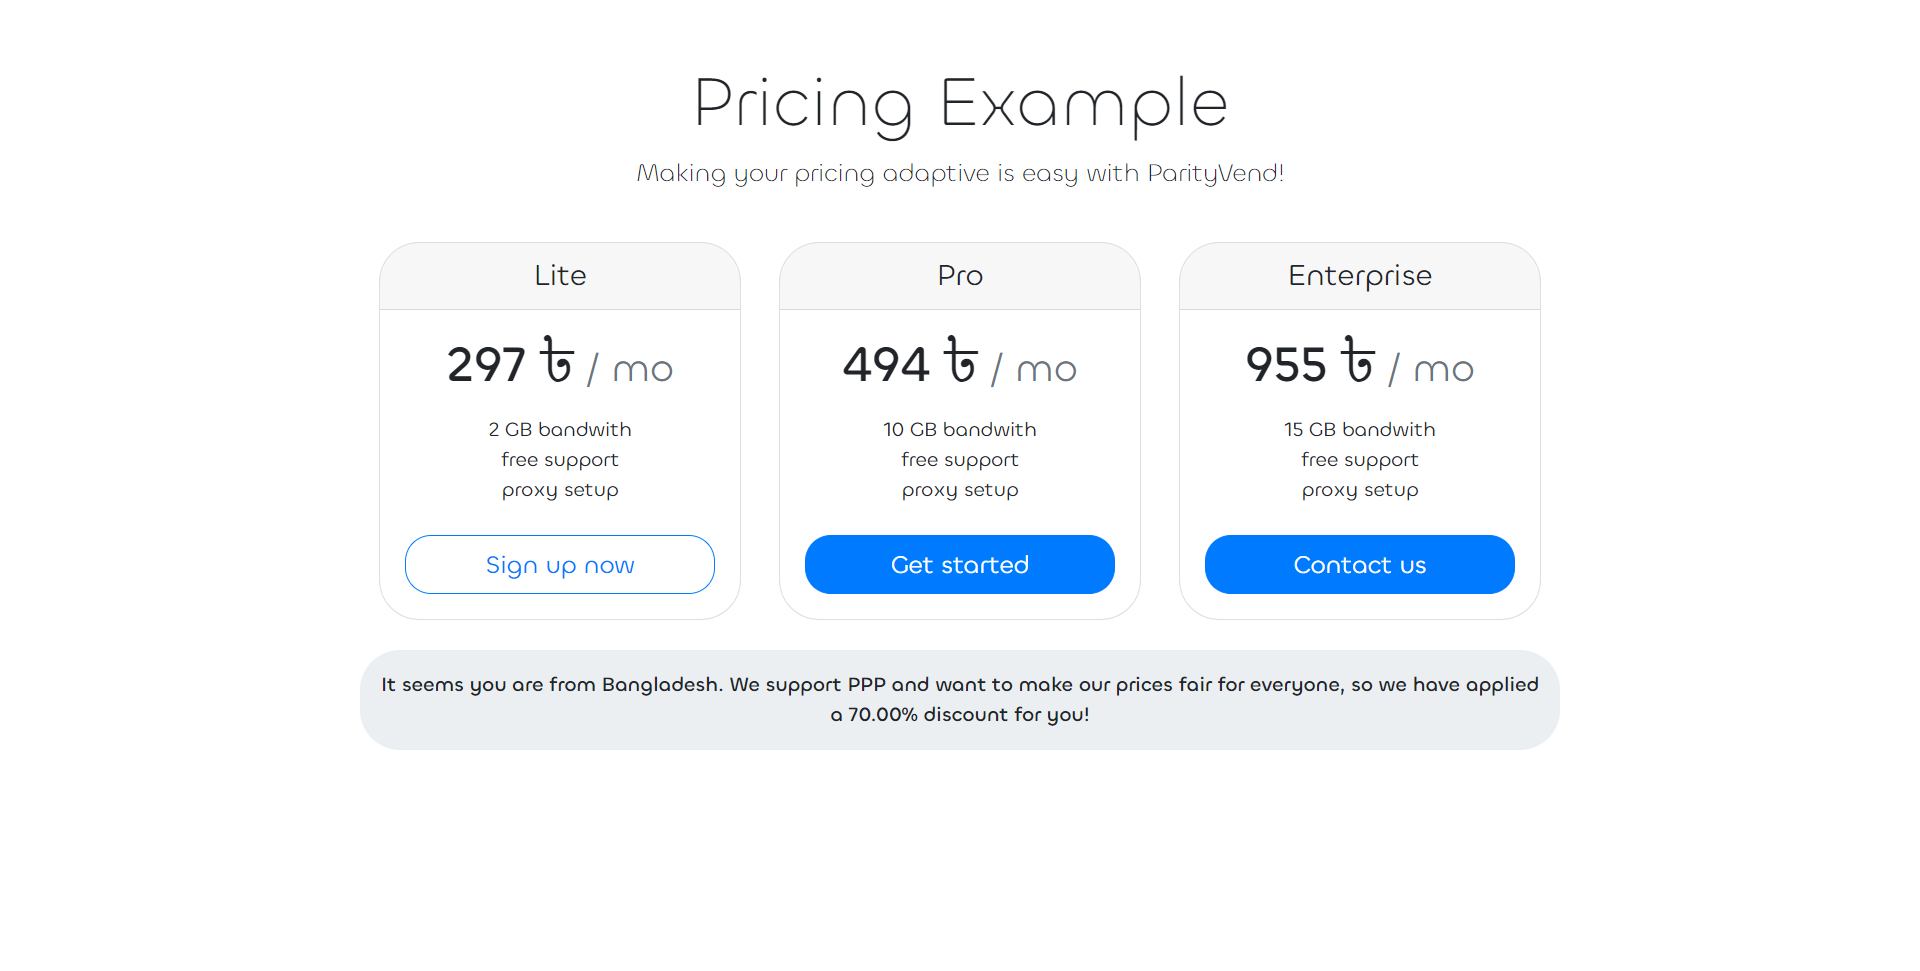
Additionally, we will add a second parameter, testing-country, and set it to BD (for Bangladesh). This parameter serves as a useful tool for testing our integration from any country while working on a local development environment. You can simply use this parameter to instruct the testing mode to “emulate” a request from the country of your choice. Simply set it to your desired country code (in this example, to BD for Bangladesh) to simulate requests originating from that location, allowing for seamless integration testing. This is an incredibly convenient and essential feature of the ParityVend API.
Below is an example of how the modified pricing page appears with the testing mode enabled and emulation set to Bangladesh:
...

async function getDiscount() {
         let url = "https://api.parityvend.cloud/frontend/testing-mode-get-discount/";
         url += '<YOUR PUBLIC KEY>';
         url += '?testing-secret=<YOUR TESTING SECRET>';
         url += '&testing-country=BD'; // Emulate a visit from Bangladesh

         const response = await fetch(url);
         const jsonData = await response.json();
...
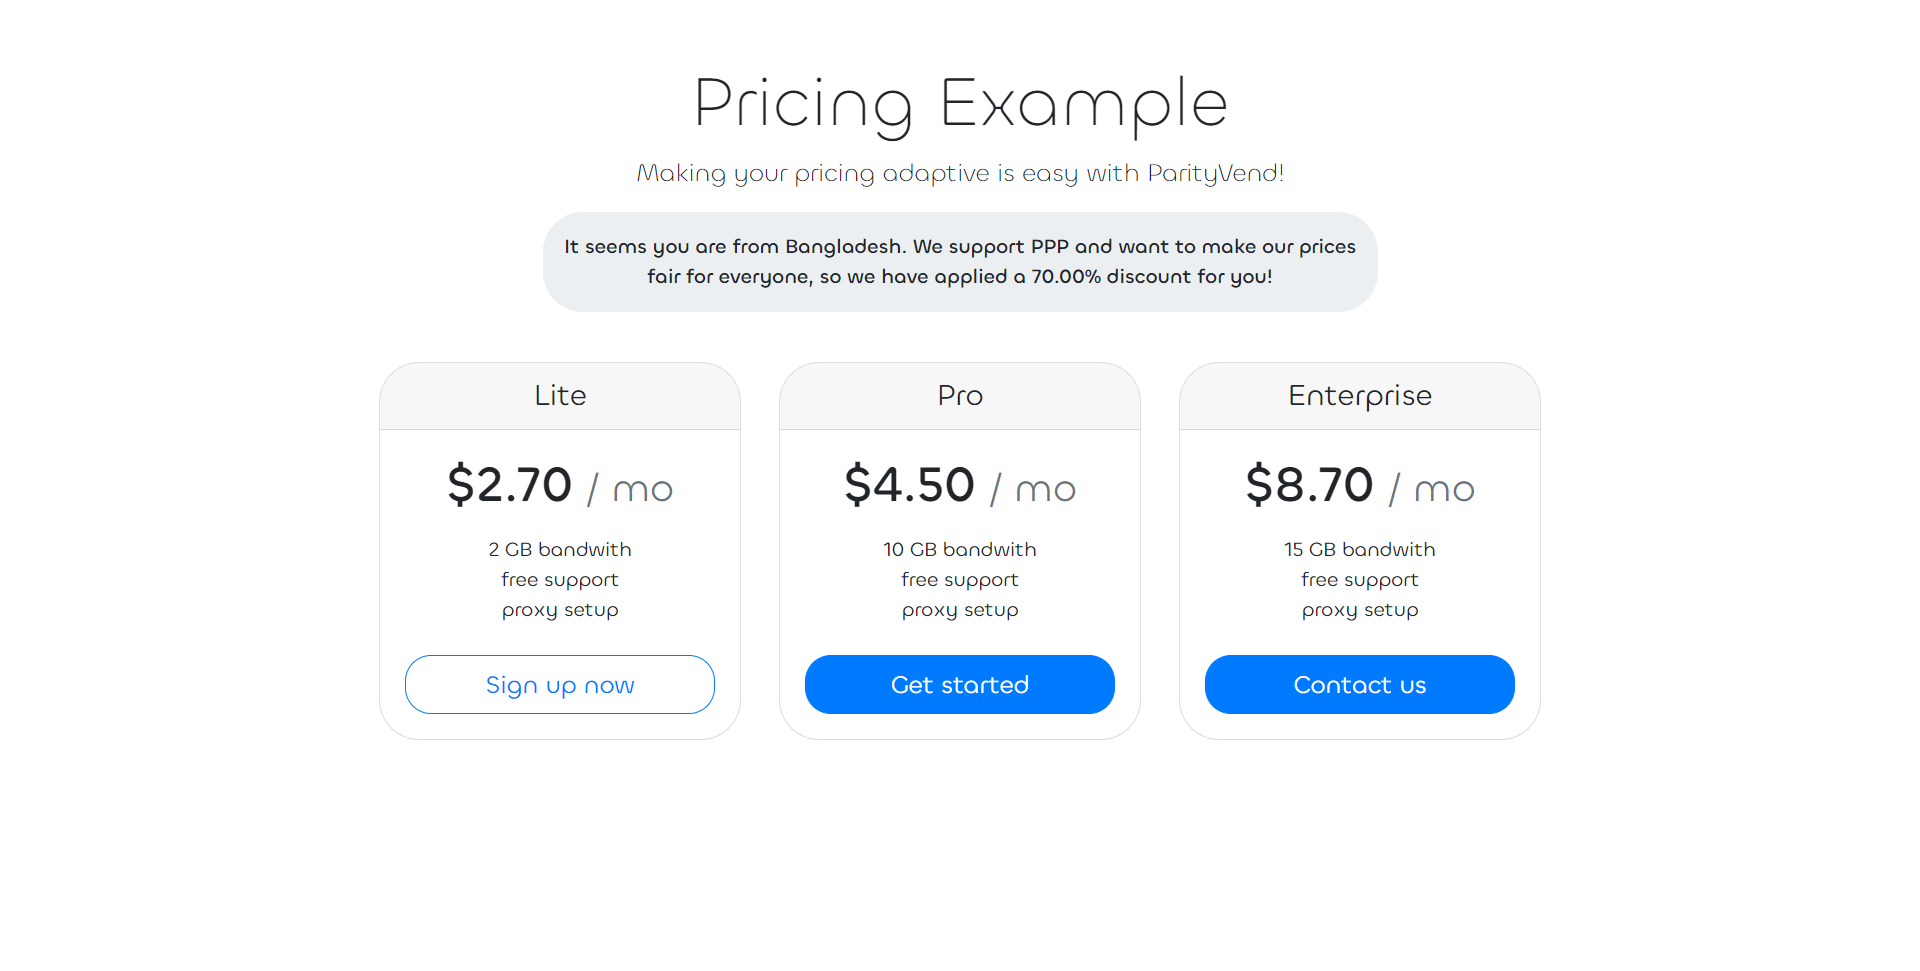
Refresh the page, and the pricing page should work! You will see a 70% discount along with a discount label:
Step 3: It works! Let’s keep improving.
It’s incredible how easy it is to make your pricing adaptive! However, our current integration is a bit too basic and lacks some important elements. Let’s improve it!
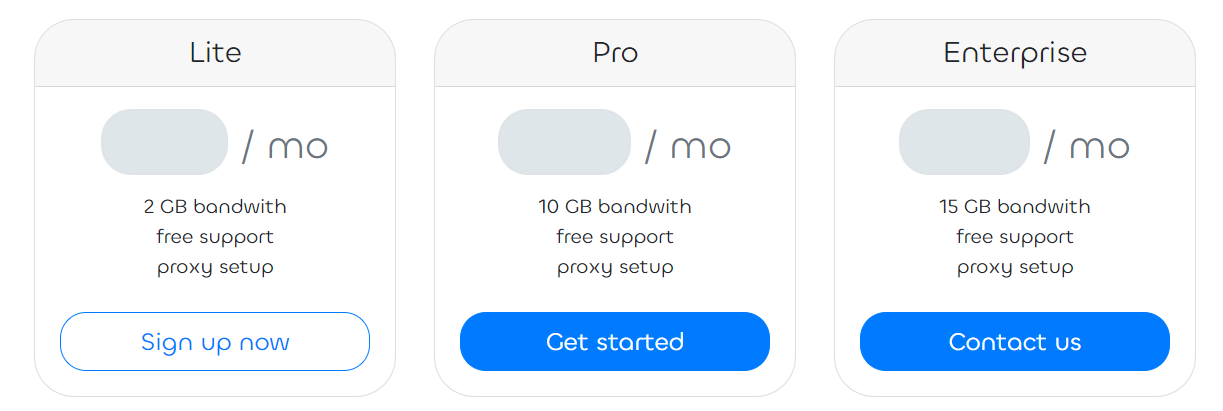
First and foremost, let’s incorporate a subtle loading animation for the prices and apply some styles. Not everyone has fast internet speed, so ParityVend may take some time to respond. As it stands, the pricing page will display empty or incorrect prices while waiting for the ParityVend API to respond. This is clearly detrimental to the user experience and the overall aesthetics of the website, so let’s address this issue.
To achieve this, we’ll make the following modifications:
Add the “plan-price-animated” class to the plan prices to introduce a “skeleton” loading animation.
Implement a “removeAnimations” function to revert the applied animations.
Include code to calculate the “additionalDelay” to ensure a seamless user experience.
The enhanced pricing page code is as follows:
   <style>
      ...

      .plan-price {
            position: relative;
      }

      .plan-price-animated::after {
            transition: opacity 0.7s;
            border-radius: 1.5rem;
            content: '';
            position: absolute;
            top: 0;
            left: 0;
            width: 100%;
            height: 100%;
            background-color: hsl(200, 20%, 80%);
            border: solid 0.15rem hsl(200, 16%, 89%);
            opacity: 1;
            animation: skeleton-loading 1s linear infinite alternate;
      }

      .plan-price-animated-end::after {
            opacity: 0 !important;
      }

      @keyframes skeleton-loading {
            0% {
               background-color: hsl(200, 20%, 80%);
            }

            100% {
               background-color: hsl(200, 20%, 95%);
            }
      }
   </style>

   <script>
      async function getDiscount() {
            let url = "https://api.parityvend.cloud/frontend/testing-mode-get-discount/";
            url += '<YOUR PUBLIC KEY>';
            url += '?testing-secret=<YOUR TESTING SECRET>';
            url += '&testing-country=BD'; // Emulate a visit from Bangladesh

            const response = await fetch(url);
            const jsonData = await response.json();

            if (jsonData.status !== "ok") {
               console.error(
                  "ParityVend API returned an error:",
                  JSON.stringify(jsonData)
               );
               return;
            }

            if (jsonData.discount) {
               return {
                  discount: jsonData.discount,
                  discount_str: jsonData.discount_str,
                  conversion_rate: jsonData.currency.conversion_rate,
                  symbol: jsonData.currency.symbol,
                  country: jsonData.country.name,
               }
            }
      }

      window.addEventListener('DOMContentLoaded', async function () {
            const prices = {
               lite: 9.0,
               pro: 15.0,
               enterprise: 29.0,
            }

            const priceSpans = document.querySelectorAll('.plan-price');

            const loadTimeStart = Date.now();
            const discountInfo = await getDiscount();

            const discountLabelElm = document.getElementById('discount-label');

            for (let i = 0; i < priceSpans.length; i++) {
               const priceSpan = priceSpans[i];
               let price = prices[priceSpan.dataset.plan];

               if (discountInfo) {
                  newPrice = price * (1 - discountInfo.discount);
                  priceSpan.textContent = '$' + newPrice.toFixed(2);
               } else {
                  priceSpan.textContent = '$' + price.toFixed(0);
               }
            }

            const elapsedTime = Date.now() - loadTimeStart;
            const additionalDelay = Math.min(1000, 1000 - elapsedTime);

            setTimeout(removeAnimations, additionalDelay);
            setTimeout(function () {
               if (discountInfo) {
                  discountLabelElm.textContent = `It seems you are from ${discountInfo.country}. We support PPP and want to make our prices fair for everyone, so we have applied a ${discountInfo.discount_str} discount for you!`;
                  discountLabelElm.style.display = 'block';
                  discountLabelElm.clientHeight;
                  discountLabelElm.style.opacity = 1;
               } else {
                  discountLabelElm.style.display = 'none';
               }
            }, additionalDelay);
      });

      function removeAnimations() {
            const skeletonObjs = document.querySelectorAll('.plan-price-animated');
            for (let i = 0; i < skeletonObjs.length; i++) {
               const skeletonObj = skeletonObjs[i];
               skeletonObj.classList.add('plan-price-animated-end');
            setTimeout(function () {
               skeletonObj.classList.remove('plan-price-animated');
               skeletonObj.classList.remove('plan-price-animated-end');
            }, 750);
            }
      }
   </script>
</head>
...
               <h1 class="card-title pricing-card-title">
                  <span data-plan="lite" class="plan-price plan-price-animated">$9</span> <small
                        class="text-muted">/ mo</small>
               </h1>
               ...
               <h1 class="card-title pricing-card-title">
                  <span data-plan="pro" class="plan-price plan-price-animated">$15</span> <small
                        class="text-muted">/ mo</small>
               </h1>
               ...
               <h1 class="card-title pricing-card-title">
                  <span data-plan="enterprise" class="plan-price plan-price-animated">$29</span> <small
                        class="text-muted">/
                        mo</small>
               </h1>


            ...

            <div id="discount-label"></div>
      </div>
   </div>
</body>

</html>
The animation we’ve just added is known as “skeleton animation”. You may have noticed a peculiar setTimeout call, deliberately included to introduce a delay. Why, you might ask?
While our loading animation is primarily designed for visitors with slower internet speeds, we must also consider those with faster connections. Without the delay, the ParityVend API might respond too quickly, causing the website to “blink” as the animation is abruptly added. This would appear more as an error than an intentional animation. Therefore, a common design practice is to introduce an artificial delay to ensure a smooth transition. This not only enhances the website’s appearance but also contributes to its overall design.
Now, we have a sleek, seamless, and, most importantly, fully automated pricing page that caters to visitors from all corners of the globe. But hold on, we can make it even better!

Another enhancement we can implement is localizing the price: converting it to the visitor’s local currency, formatting it with the respective currency symbol, and applying automatic formatting. With ParityVend, this can be easily achieved! Modify the <script> to incorporate automatic currency formatting using hourly exchange rate data:
<script>
...

if (discountInfo) {
   newPrice = price * (1 - discountInfo.discount);
   newPrice *= discountInfo.conversion_rate;

   fixedNumber = price > newPrice ? 2 : 0;
   priceSpan.textContent = newPrice.toFixed(fixedNumber) + ' ' + discountInfo.symbol;
} else {
   priceSpan.textContent = '$' + price.toFixed(0);
}

...
</script>
When you refresh the page, you’ll notice that your prices are now displayed in Bangladeshi Taka (BDT) instead of US dollars. This seamless conversion is made possible by ParityVend, making the shopping experience more convenient for your customers.
To further enhance the user experience, consider displaying only the final price in local currency without any mention of discounts or the visitor’s country. This approach, known as “silent” geographical pricing, is employed by leading companies like Netflix, Apple, Microsoft, and Spotify. By removing the discount-label element and related logic, you can achieve this streamlined presentation.

Step 4: Going Live
Once you are satisfied with the integration and ready to deploy it to a live website, it’s crucial to disable the testing mode. To do this, simply remove the testing-mode- prefix from the endpoint’s URL, as well as the testing-secret and testing-country parameters. It’s essential to ensure that the testing mode is disabled before going live, as leaving it enabled could expose your integration to potential exploitation by attackers. For more information on the risks associated with running the testing mode in a production environment, refer to the “ParityVend Testing Mode” page.
Below is an example of the code in its live version, with the testing mode disabled:
<script>
...
     async function getDiscount() {
         let url = "https://api.parityvend.cloud/frontend/get-discount/";
         url += '<YOUR PUBLIC KEY>';

...
</script>
Congratulations on transforming your pricing strategy with ParityVend! You’ve successfully upgraded your pricing page from a static, outdated model to a dynamic, adaptive system that tailors itself to each visitor, fostering business growth and increased profitability.
What’s Next?
As you prepare to integrate the ParityVend API into your project, your primary resource will be the comprehensive API reference page, providing detailed descriptions of each endpoint. Additionally, we highly recommend exploring the “Complete Overview” series for a deeper understanding of our platform. Should you encounter any errors during integration, be sure to consult the “Debugging Guide”, which contains a comprehensive list of error codes and messages to assist you in troubleshooting.